Printing in the Library
Computers that can use Printers in the Library
- (University members only) User Internet Terminals at the Main Building 1st Floor Computer Workstation
- (University members only) Personal laptops
- Main Building 1st Floor PCs for microscanners
- Main Building 1st Floor information retrieval terminals
- Main Building 1st Floor PCs for visitors
* Printing directly from data storage device (e.g., USB flash drive) is not available.
How to Use
Click here for the instruction.
How to Install the Printer Driver
If you are printing from your own personal laptop, please install the following printer driver on your own. You must have administrator privileges on the PC to do this.
For Windows
* If you have installed the driver before October 13, 2020, please change the print destination setting (IP address) . Please refer here for the procedure.
Driver List
Supported OS: Windows 8/8.1/10
- Hit_Lib_Mono_North (North: Black and white only, B5 unavailable): 32bit / 64bit version
- Hit_Lib_Color_South (South: Black and white / Color selectable, B5 available): 32bit / 64bit version
*The download is only available from within the campus.
How to Install
- Extract the downloaded zip file and run theinstaller.
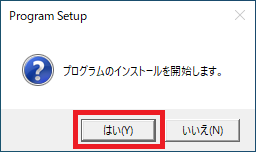
- Press “Yes" button when you are asked whether to start the installation.
- When the following screen appears, press “Start Installation".
- The installation takes about a minute. When the following screen is displayed, press “Yes" and restart your PC.
Steps to Change the Settings of the Installed Printer Driver
If you have installed the driver before October 13, 2020, please change the print destination setting (IP address).
- Go to “Control Panel > Hardware and Sound > Devices and Printers".
- Right-click the printer you want to change the setting and click “Printer Properties".
- When properties are displayed, go to the “Ports" tab and click “Add Port".
- The “Printer Port" window will appear. Select “Standard TCP/IP Port" and click “New Port".
- The “Add Standard TCP/IP Printer Port Wizard" will appear. Click “Next".
- Enter the “Printer Name or IP Address" as shown here (accessible only from within the campus) and click “Next".
- When the TCP/IP port is detected and a window saying “The device could not be identified" appears, check the “Custom" box in the “Device Type" section and click the “Settings" button.
- The “Standard TCP/IP Port Monitor Configuration" will appear. Select “LPR(L)" for “Protocol" and enter “lp" for “Queue Name" in “LPR Settings". Click “OK".
- Return to the “Add Standard TCP/IP Printer Port Wizard". Click “Next”.
- When the window that reports the completion, click “Finish/Complete".
- Click “Close" in the “Printer Ports" window.
- Click “Apply" in the property, then click “Close".
For Mac
See below.
How to print using a Mac in the library
* Accessible only from within the campus.
Inquiries
Please contact us here.
Disclaimer
As a rule, no refunds will be made for items output to card-operated printers once they have been output, circumstances notwithstanding, with the sole exception noted below.
- Measures for refund may be taken in instances where the printer itself is clearly malfunctioning, such as when excessive lines are present on printed material. Take the printed material and copy card and inquire at the University CO-OP.